The roles worms play in an aquaponics system:
Worms are an incredible asset to any media based aquaponics system.
- They break down the solid waste from the fish, and excess roots and other materials that plants slough off, and make them more bio-available to the plants through their excrement: vermicompost. This additional metabolic layer in media based systems is what allow media growers to avoid both the requirement to filter out solid waste AND the requirement to frequently clean out their grow beds.
A 12? (300 mm) deep grow bed with a healthy population of worms will probably only need to be cleaned out every five years or so, if then.
Worm farming, Vermicompost, and the ‘tea’ that results from soaking vermicompost in highly oxygenated water, have been studied and have concluded that vermicompost and the corresponding ‘tea’ are tremendously beneficial because they:
- Suppress plant disease including Pythium, Rhizoctonia, Plectosporium, and Verticillium
- Suppress plant parasitic nematode
- Suppress plant insect pests, including tomato hornworms, mealy bugs, spider mites and aphids
Besides helping battle plant diseases, worms have also been shown to mitigate pathogens that affect humans. The earthworms also release coelomic fluids that have anti-bacterial properties that destroy all pathogens in the waste biomass. They produce ‘antibiotics’ that kill the pathogenic organisms in the waste and soil where they inhabit and render it virtually sterile.
Because fish are cold blooded creatures, their waste cannot contain E. coli – that is reserved for warm-blooded creatures only. In fact, the only way that these pathogens can be present in your aquaponics system is if they are introduced from an external source.
So you need to be sure that redworms that are introduced are not plopped in the aquaponic medium with any of the bedding they were living in. Better yet, purge their systems (guts) by putting them in wetted down corn meal for 24 hours (okay, be sure it is not e-Coli harboring corn meal – or use oatmeal or cream of wheat wetted down). Then wash off the redworms, and introduce them into the aquaponics system.
Worm Farming (Earthworm)
Worm farming or vermiculture, as it is also called, is done by gardeners who keep earthworms to provide themselves with the rich vermicompost which can be made in a matter of months. The casts, or the manure that is produced by earthworms, is called vermicompost and the whole process is called vermicomposting.
Vermiculture, therefore is just a fancy word for worm farming.
There are so many benefits to keeping earthworms, however you need to make sure that you get the right species to do the job.
Although there are hundreds of different species of earthworms, there are about 4 main categories of earthworms:
1) The Garden Worm
2) The Native Nightcrawler
3) The African Nightcrawler
4) The Red Worm
The garden worm is the large worm that you will see in your own gardens, especially after the rains have visited. They have a small section of their body that seems to have a wider band. Although they may be plentiful in your garden these are not good worms for your composting venture.
The native nightcrawler is another earthworm variety that is no good for your farms because it is a slow breeder and doesn’t like his habitat disturbed so a rather fussy worm that is best left alone.
The African nightcrawler is a close relative and again is a slow breeder and not worth keeping.
The red worms are those that are well sought after by fishermen and worm farmers alike, therefore also known as the manure worm. Although there are two types of red worms, the Lumbricus Rubellis is the worm you want. It is able to consume large amounts of household garbage, reproduces quickly and doesn’t mind having his habitat disturbed from time to time when you want to harvest the castings.
Although they are not very large in size, adults only reaching 3 inches on average, which is different to some of the other worms, like the African nightcrawler whose average length is 5 inches, although can reach up to a foot in length, these little manure worms reproduce every 7 days.
Some of the slower breeds of earthworms only reproduce once every 2 years. The red worm is mature at 9 months but can start mating as early as 2 months old and has a lifespan of 15 years.
The red worm is the species to buy when setting up your new worm farms. Not only will this be a good choice for your garden, but these wrigglers are very popular with aquaponic farmers and fishermen too. Also they do not drown while in the water, continue to wriggle.
How to Set up a Simple Worm Farm
For each 500 g (1 pound) of food waste produced each week, you will need at least 30 cm squared (1 ft squared) of composting bin space. Therefore choose the size of the composting bin, or composting tumbler that is appropriate for your size family.
As a benchmark for 2-3 people you should have composting bins measuring 60 x 60 x 30 cm stocked with 1 kg of worms.
Worm bins can be either:
- Plastic
- Wood
- Metal
How deep should a worm box be?
You have to look at the nature of these worms. They will live towards the top half of the soil, therefore anything deeper than 12 inches (30 cm) will not only be wasteful, but it can also cause your bins to smell due to too much material and micro-organisms that will flourish in deep material where there is no light and little oxygen.
Composting bins categories:
1) Non-continuous composting bin
This is an undivided container, a layer of organic matter is placed in the composting bin lining the bottom. Worms are then added and organic matter for composting is added in a layer above the bedding. Another layer is added on top of the organic matter and the worms will start to compost the organic matter and bedding. This type of bin is often used because it is small and easy to build. But it is relatively difficult to harvest because all the materials and worms must be emptied out when harvesting.
2) Continuous vertical flow composting bin
This is a series of trays are stacked vertically on top of one another. The bottom tray is filled first, in a similar fashion to the non-continuous bin, but is not harvested when it is full. Instead, a thick layer of bedding is added on top and the tray above is used for adding organic material.
Worms finish composting the materials in the bottom tray and then migrate to the one above. When a sufficient number of worms have migrated, the worm compost in the bottom tray can be collected and should be relatively free of worms. These bins provide an easier method of harvesting, as they do not all have to be emptied out.
3) Continuous horizontal flow composting bin
This is a series of trays are lined horizontally. This method too relies on the earthworms migrating towards a food source in order to ease the process of harvesting. The composting bin is usually constructed to be similar to a non-continuous bin but is longer and lies horizontally. It is divided in half, usually by a large gage screen of chicken wire.
One half is used until it becomes full, then the other half is filled with bedding and organic matter. In time, the worms migrate to the side with the food and the compost can then be collected. These bins are larger than a non-continuous system but still small enough to be used for small-scale worm farming, with the added advantage of being easier to harvest.
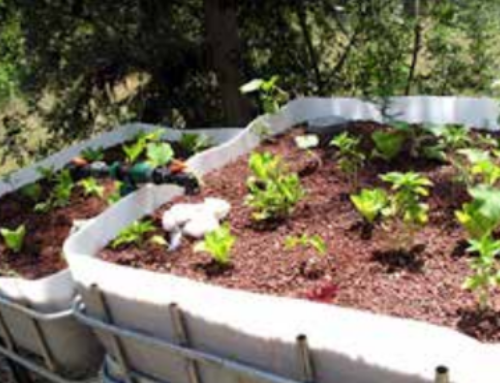
Placing your Worm Farm Bins
place the bin in a sheltered area out of the sun. In winter, you could move the bin to the garage, or surround it with some form of shelter like hay bales to keep the snow, rain and cold out.
All you need to start your worm farm are the following:
* A plastic bin with a lid to keep away the flies and to cut down on odors while the matter is decomposing. However, your worms will need oxygen, so drill holes in the bottom of the bin for ventilation and drainage and further help this process by placing the bin on some bricks to elevate it off the ground.
* Place some bedding in the bin for the worms in the form of either shredded paper (really fine), peat moss or shredded coconut hair (coir). Do not use glossy paper or magazines. This should not be more than about a fifth of your bin space. Remember that the worms eat the bedding, so you need to replenish this every few months.
* Water to dampen the bedding. Make sure that you don’t flood the composting bin with too much water. You just want to make the bedding moist.
* Now place your worms into the bin. Make sure that you do this on a sunny day and that the sun is shining into the compost bin.
* Earthworms don’t like the sun and they will immediately start digging down into their new home. If you don’t have the sun shining for this exercise you may find that most of your worms have crawled out of the bin and left for greener pastures!
* Now cover with two handfuls of soil to the bedding in each bin to supply “roughage” for the worms. Adding crushed eggshells provides not only roughage but also calcium for the worms, and it lowers acidity in the bin. Powdered limestone will also reduce the soil acidity, but don’t use slaked or hydrated lime as this will kill your worms. Now put the lid down on the bin.
Feeding your Worms
There are two methods of adding food scraps to the bin when worm farming.
* Top feeding — This is when food scraps and biodegradable matter is placed directly on top of the existing layer in a bin and then covered with another layer of bedding and soil. This is repeated every time the bin is fed.
* Pocket feeding — a top layer of bedding is maintained and food is buried beneath by drilling down into the bedding. The location of the food is changed each time, rotating around the bin to give the worms time to decompose the food in the previously fed pockets. The top layer of bedding is replaced when necessary.
One pound of worms will eat about three and one half pounds of food scraps a week. If you add more food than your worms can handle, anaerobic conditions will set in and cause the soil to sour. Make sure that food scraps are always buried under the soil to avoid attracting flies and rodents.
What do Earthworms Eat and How much do I Feed them?
The answer to this frequently answered question is not cut and dried. It really depends on what sort of waste you are feeding your worms and in what condition they receive it.
If you are giving them waste from your kitchens that is high in water then they will go through watermelon, for example a lot quicker than they will go through uncooked pumpkin. However, if you were to process that same waste and put it through a food processor or blender, then your worms could process that far more quickly and then could eat 3-4 times their body weight in one day.
However, as a rule of thumb earthworms eat 1/3rd to 1/2 of their bodyweight in food, per day.
Therefore 2 lbs of earthworms which amounts to about 4000 worms could eat their way through 1lb food per day. The bigger your household, the more garbage you will generate and therefore the bigger your worm farm could be.
* Get your food scraps that you have been saving up. The best scraps are fruit and vegetable peelings, fruit skins, apple cores etc. If you want to help your worms along, some of those scraps could be liquidized in a blender to quicken the process.
Additions such as cow, sheep, pig or chicken manure is a bonus, but it is not a necessity. If you keep rabbits then you should think of keeping earthworms as rabbit manure is perfect for them as long as you meet two conditions;
* Coffee grounds, tea leaves and coffee filters can all be fed to your worms.
* Meat is important to your worms as they are a good source of nitrogen. However, the problem with adding meat to your bins is that it will quickly spoil and smell. In order to minimize the smell, chop the meat scraps up small, and mix them with sawdust before adding to the bins.
* Chicken mash should be fed to your worms to give them a boost for both propagation and fattening up if you are wanting to sell them off to fishermen. Just sprinkle some chicken mash on top of the beds. You will soon know just how much your worms will take down however, don’t overfeed as the soil can turn soil very quickly.
Studies have shown that there is a correlation between food types and rates of breeding. Food that is high in nitrogen results in faster breeding. However, remember that the carbon: nitrogen ratio of foodstuffs in your bins should be about 20:1 respectively.
What not to Feed Earthworms
- In setting up your worm farm avoid feeding the worms the following: Rotten foods, fats or dairy products, citrus, onions and garlic, fish, bones, tobacco, or pet or human manure.
- Too much fat prevents the earthworms from breathing properly as they breathe through their skin.
- Also avoid using too many watermelon skins as they really don’t have a lot of nutritional value for the earthworm and they also disrupt the moisture levels of the compost.
- If your lawns have been sprayed with any weed killer avoid feeding these clippings to the worms.
Leave your worms alone for the majority of the time. They don’t really like being disturbed.
Feeding them just once or twice a week is enough, as long as you remember that the longer you have your worms the more you will have, under the right conditions, and so you need to increase the amount of food that you give them accordingly. However, never overfeed.
When worm farming make sure that you have enough moisture in your bin, without it getting too wet. This is because the earthworm breathes through its skin as previously mentioned, and they need moisture to survive. However, if the soil is too wet then you end up with carbon dioxide in the soil instead, which will poison them.
Also, make sure that the compost is alkaline rather than acidic. Your worms will be healthy when pH of the soil is between 6.8 and 7.2. This ideal pH level will allow your worms to successfully digest their food. You should turn the bin contents over to aerate the soil. Scarify the top 3-4 inches only and do this about every 3 weeks.
To keep the moisture in and to keep the light out, a good way of doing this is by using a damp piece of burlap and placing it on top of the worm bins, or containers. Carpet underlay can also be used. Not only are you keeping the light out, but you are also helping to insulate the soil and protect it against extreme temperatures.
Finally, your earthworms need warm soil. 16º-25º C
Summary:
- Oxygen
- Moisture
- Food Scraps
- Optimal soil pH
- A dark place to live
- Warmth
Adult worms produce three cocoons a week and each cocoon will contain at least three baby worms and sometimes ten or more. Every three months the worms should be harvested or separated from the castings.
Make sure that your soil never smells sour. If this happens it means that the soil is too wet. If it smells sour then add calcium carbonate, also known as garden lime – very different to ordinary lime which will kill your worms, crushed egg shells, dirt, sand, or more newspaper to soak up that excess moisture.
So how wet should your compost be when worm farming? – About 75% moist. What exactly does this mean? I can already hear you ask. Well, if you take a handful of matter and squeeze it hard you should only get about a drop or two of liquid. This is just how your worms like their environment and will be quite happy to stay.
If conditions are good, you will double your worm population in six months. If the worms become crowded and you do not remove any, then worms will slow down their reproduction.
When to harvest
Harvesting should begin when the bedding and consumed food has turned a rich dark brown. It should be moist and crumbly, with a consistency of coffee grounds.